In part 1 I explained some of the basic concepts behind the hackintosh, and in part 2 I showed the easy way to create a hackintosh VM using VirtualBox. In this post I'll show the harder, but more flexible, way, which will allow you to have a custom screen resolution as well as connectivity to iCloud and iMessage.
Caveats
As I mentioned last time, there is also currently no way to have accelerated graphics in VirtualBox due to a lack of drivers, and there may be problems with audio as well. I am still unaware of any ways to work around this.
The guide
The instructions here work as of macOS Sierra 10.12.1/10.12.2 and VirtualBox 5.1.10. If you are using other versions, things may have changed, and so there is no guarantee that this guide will be accurate.
Step 0: Prerequisites
In order to follow this guide, you will need:
- The 16GB or higher installer disk with the macOS installer from part 2
- A real Mac with Internet access
- A VM host machine with VirtualBox installed and plenty of free space
Step 1: Download and install Clover
Download the latest Clover installer (r3961 at time of writing) to your real Mac. Right-click the .pkg (package) file and select Open. Change the install location to the installer disk, which should be named "Install macOS Sierra". After that, click the Customize button and ensure that the following options are selected:

Click Install and enter your password to proceed. macOS might show a warning that the "package is incompatible with this version of macOS and may fail to install". It should be safe to ignore that warning and click Install Anyway.
After the installation completes, copy the downloaded Clover installation package to the "Install macOS Sierra" installer disk - you'll need it again later.
Step 2: Configure Clover
As I explained in part 1, Clover is a bootloader capable of emulating EFI and various related firmware components. These components need to be configured so that upon bootup Clover sends the necessary information to macOS for correct operation. These configuration settings are stored in a file called config.plist. When placed in the correct location, this file (and optionally other associated files) will be read by Clover and used to configure the information sent to macOS.
In order to expedite matters, I've created a "base" configuration file that can be used as a starting point. Download this file to your real Mac. Ensure that it's named config.plist after the download and that its contents haven't been mangled by your browser.
Modifying the configuration file by hand can be a bit of a pain, so we'll use Clover Configurator to automate this process a bit. Download the Vibrant edition of the Clover Configurator.
Open the downloaded config.plist file in Clover Configurator.
In the "SMBIOS" section, click the "magic wand" button to create an emulated Mac profile. Select the type of device you want to emulate, and then select the specific version from the primary dropdown. After that, click the two "shake" buttons to create a random serial number. After clicking OK, copy the "Serial Number" field to the "Board Serial Number" field and append five random letters or numbers to the end. Then copy that resulting board serial number into the "MLB" field under the "Rt Variables" section. This is all demonstrated here for reference:
After you've completed the above steps, open a new Terminal window and type in uuidgen (this will output a UUID on the next line). Copy this UUID to the clipboard. Go back to Clover Configurator and the "SMBIOS" section, and paste the UUID into the "SmUUID" field.
To set your desired screen resolution, go to the "Gui" section, and select the screen resolution you want from the dropdown. The default resolution is 1920x1080.
To set the amount of RAM you want to give to the VM, go to the "SMBIOS" section, and change the Memory information accordingly. The amount (marked "Size") is the only value that you should change if you'd like to choose anything other than the default of 4096MB.
Then you can close Clover Configurator. The config.plist file should have your modifications saved in it.
Step 3: Finalize the macOS installer changes
You'll need to copy the config.plist file to two locations: one on the main "Install macOS Sierra" partition next to the Clover installation package, and one on the EFI partition so that Clover will see it. The installer disk's EFI partition should already be mounted after Clover's installation process. If not, you can mount it like so:
sudo mkdir /Volumes/EFI
sudo mount -t msdos /dev/disk2s1 /Volumes/EFI
If necessary, replace disk2s1 above with the appropriate disk number. Note that s1 should still be used, as the EFI System Partition should always be partition number 1.
Copy the file to EFI/CLOVER on the EFI partition, replacing the existing config.plist there. After you've copied the file to both locations, eject the installer disk, unmounting all partitions.
Step 4: Create the VM
Open VirtualBox on your VM host machine and create a new VM:
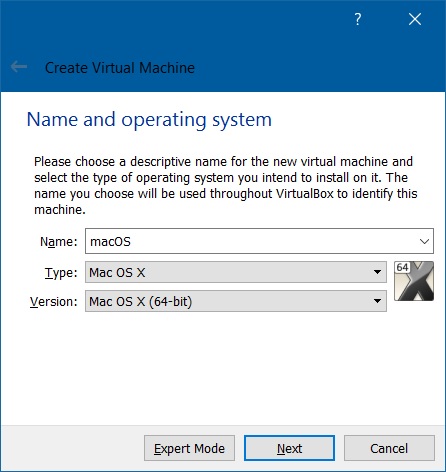
For simplicity, use the above settings. In later screens, select the same amount of RAM as you chose in Clover Configurator (4096MB by default), and create a dynamically allocated 60GB VDI virtual hard drive.
Step 5: Configure the VM
Certain VirtualBox settings are easier to configure via the command line, and some are just unavailable in the GUI. The VBoxManage command line tool allows for terminal-based control over VMs.
IMPORTANT: Before using VBoxManage, close all VirtualBox windows! Otherwise, certain settings may fail to apply, or you might even end up with a corrupted VM.
Enter the following commands to further configure the macOS VM, replacing the screen resolution with what you chose in Clover Configurator and the (copyrighted Apple key) with the actual key that you can easily find online:
VBoxManage modifyvm macOS --firmware bios --vram 128 --usb on --usbehci off --usbxhci off

VBoxManage setextradata macOS "CustomVideoMode1" "1920x1080x32"

VBoxManage setextradata macOS "VBoxInternal/Devices/smc/0/Config/DeviceKey" "(copyrighted Apple key)"
Step 6: Connect your installer disk
This should be a simple step, but unfortunately VirtualBox makes it difficult. Although it is possible to connect USB devices to virtual machines, you cannot normally boot from them, and that is precisely what we need to do. Luckily, VirtualBox does provide a workaround for this via a virtual raw disk access file.
First, connect your installer disk to your VM host machine. Next, you'll need to determine its identifier on your machine. In Windows, you can do so on the command line by entering the following:
wmic diskdrive list brief
In *nix, you can inspect the output from the mount, df -h, lsblk, or parted -l commands.
Determine which disk represents your installer disk and remember its Windows DeviceID (usually in the format of \\.\PHYSICALDRIVE#) or *nix device name (usually in the format of /dev/sdX or /dev/disk#). It is important to note that you should use the name of the device itself and not of its partitions.
Next, create the raw disk access file. In Windows, you will need to launch a new command prompt as Administrator. In *nix, you may need to prefix the command with sudo. Enter the following:
VBoxManage internalcommands createrawvmdk -filename C:\usb.vmdk -rawdisk \\.\PHYSICALDRIVE#
Replace the filename above with an appropriate *nix path if you're not on Windows, and replace the physical drive identifier as needed.
In the same administrative command prompt, enter the following:
VBoxManage storageattach macOS --storagectl SATA --port 2 --type hdd --hotpluggable on --medium C:\usb.vmdk
Replace the filename above if necessary.
NOTE: This differs from the equivalent step in part 2. Launch VirtualBox as Administrator in order to allow it to access the raw disk. Go to the macOS VM's settings, and look at the "Storage" section. Ensure that you have two hard disks and one optical drive under the SATA controller. Then, select the main macOS drive that should be the first item under the controller and change its SATA port from 0 to 3. This is necessary for the installer disk to be able to boot in BIOS mode.
Step 7: Install macOS
Start the macOS VM. If VirtualBox asks to pick a startup disk or ISO, just cancel out of that dialog.
Once macOS boots up, use the Disk Utility to format the 60GB disk, naming it "Macintosh HD", and then install macOS onto it.
After the installer completes, there will be a first run setup wizard. When prompted to sign in with your Apple ID, you should be able to sign in if you so choose. When prompted to send diagnostics and usage data to Apple, uncheck that box. Since this isn't real Mac hardware, it would not be helpful for Apple to try diagnosing any issues from unsupported configurations.
Step 8: Install Clover in the VM
Although you are already able to boot the VM, VirtualBox is currently using the installer disk's copy of Clover. You'll need to install it on the 60GB drive before removing the installer disk.
Open the "Install macOS Sierra" partition. You should see the Clover installation package and the config.plist file there, which you copied earlier. Install Clover on "Macintosh HD" with the same options selected as in step 1 above.
After the Clover installation, the EFI partition of the main drive should be mounted. If not, mount it using the same commands as in step 3 above, but make sure that you are mounting the main disk's EFI partition and not that of the installer disk.
Copy the config.plist file from the installer disk to the EFI/CLOVER folder on the EFI partition, replacing the existing one there.
Finishing up
At this point, it's a good idea to shut down the VM, go to its storage settings, and remove the raw disk access VMDK file. You may want to remove it from VirtualBox's Virtual Media Manager as well.
You will want to disable power saving in the VM. VirtualBox seems to dislike it when the guest OS tries to sleep. Go to System Preferences, select Energy Saver, and disable both the computer and the display from going to sleep in the guest OS.
Final thoughts
In this guide I showed you how to create a mostly-functional macOS VM. I suspect that its functionality can be improved with further modifications to the config.plist file and possibly with a custom DSDT. I leave these possibilities as an exercise for the reader.
Lastly, these posts wouldn't have been possible without the various sources of information that I used to gain a better understanding of macOS internals and the various jargon involved. This thread (and many others) on InsanelyMac, the Clover configuration reference, and helpful pointers from Auri's post on setting up a virtual macOS Xamarin environment are among those I found quite useful. And it goes without saying that those who developed the tools and systems used here deserve the most credit.